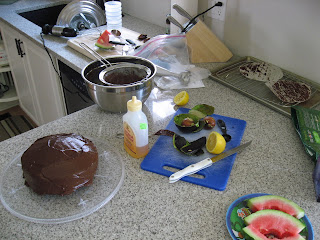
For this cake, because there was just too much riding on it, I decided not to experiment and I went with a mix. I bought Bob's Red Mill Gluten-Free Chocolate Cake Mix a while ago, and had been "saving" it for a special occasion. Being Easter, I didn't want to miss out on the dessert fest, so I busted this bad boy out. Wow. It turned out GREAT. I made it according to the directions, including cutting out a circle of parchment paper for the bottom of the cake pans (which made it MUCH easier to release from the pans). It was light but dense and chocolatey at the same time.
Now...for the piece de résistance... the icing. I usually find icing just tastes like fat and sugar...because, well, that's what it is. So recently I had icing that was made using avocado instead. Now THAT is a dream come true!!! I am always looking for that which is both nutritious and delicious, and this is such a great way to add nutrition while still upping the delicious factor. After scanning various recipes, here's what I came up with for mine:
Divine dark chocolate avocado icing (gluten free, casein free)
2 ripe avocados
1/2c cocoa (organic if you've got it!)
1/2 c agave sweetener (you could totally adapt this and use honey, maple syrup or coconut sugar)
2 tsp lemon juice
Scoop out all the ingredients and mix with an electric mixer (or with some SERIOUS elbow grease). Then, scoop out bit by bit and using a spatula, you just press it over a wire mesh sieve and the last of the green bits in the icing are smushed away. :)
Note: This "icing" could totally be used as a quasi-chocolate fondue, or as a chocolate spread on bread (what a treat!!).
You'll also notice in this photo that I cut the top off of that tier of cake. I find it better for putting the cake together if I slice off any "risen" portion in the cake so I can lay the next tier flatly on top.
Once that's done- you ice the bottom tier, then put the top one on, then ice the top tier and the sides. I might also suggest that you could put a few other things between the layers if you're so inclined. Here are a few ideas:
chopped up, or mini chocolate chips
melted peanut butter drizzle
crushed candy canes
sliced strawberries
etc.
So, unfortunately I didn't get a final picture of how this looked once I'd drawn the bunny on it in white icing (hee) but here is the semi-final product:
YUM!!!!!
I'd also like to point out the carnage in my kitchen, when Miss Dropsie has finished a "masterpiece"... This is why Mr. Pick It Up has a hard time with me being in the kitchen..."inventing".
Let me know how yours turns out!


1 comments:
Holy crow-that looks amazing!!
Post a Comment